The first thing you need is a custom shader to convert the world-space vector to a raster-space one. I found this SL code at this forum post which references this forum post.
Here is a link to the uncompiled SL file and here is a link to the compiled SLO file (though I'm not sure if that will work for you). If you can't compile shaders leave a comment and I'll get to making a guide on how to set up the environmental variables and stuff.surface motionVector(){ // Get blur vector on image plane in pixels point rasterP = transform( "raster", P ); point rasterPdPdtime = transform( "raster", P + dPdtime ); vector pixelsMoved = rasterPdPdtime - rasterP; // Invert the red channel Ci = color( float (( 1-(comp(pixelsMoved,0)))), comp(pixelsMoved, 1), comp(pixelsMoved, 2)); Oi = 1; }
Anyway, you can load this shader into Renderman for Maya by making a new RenderManShader node in your Hypershade or Node Editor.

Now you can use the browse button in the Attribute Editor to load the shader SLO file.

Now apply your new shader to all of the objects in your scene and then it's time to change some render options. Open your render settings and go to your output's Pass Settings and hit the Add/Remove Settings button.

In the Add/Remove Settings window you need to add the Hider and Sample Motion Attributes.

Once you've added the new Attributes. Hit close and then go and change the Attributes. The Hider should already be set to Hidden, and you need to uncheck the Sample Motion checkbox. This makes it so that it does not render in the motion blur into the final image.

From here, go to the Quality tab and set the Shading Rate to 1.0, set the Pixel Samples to 1.0 and 1.0. And set the Filter Size to 0.0 and 0.0. This is so that the render engine doesn't try to sample the result. Similar to Z-Depth, you don't want to sample this pass as it can cause it to be inaccurate.

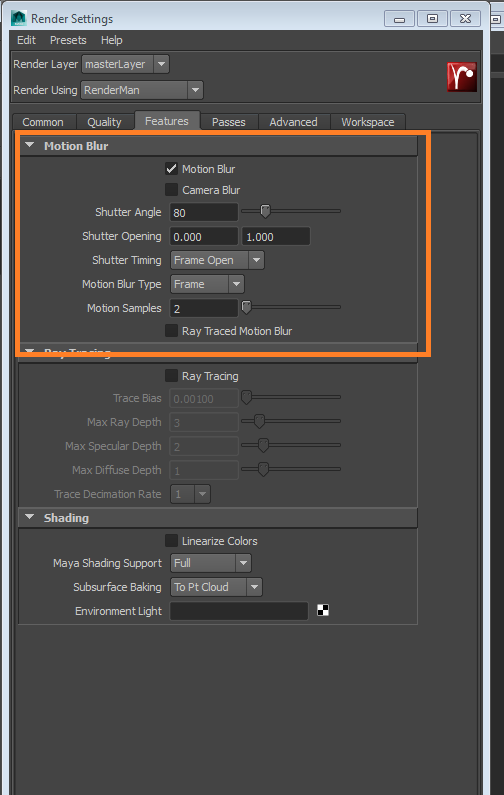
The last settings you need to change are in the Features Tab. You need to turn Motion Blur on. I used the defaults but turned off Ray Traced Motion Blur. You might be able to use SubFrame and Frame Center but it didn't line up and I didn't need that much precision anyway so I just used Frame Open and Frame. Also, if your camera is moving you should enable Camera Blur as well.
Now you're ready to render. If you render it to IT it might look a little crazy. As someone who has only used the VRay Motion Vectors before this looked wrong. But once I brought it into Nuke it worked fine.

Now in Nuke you need to shuffle the R and G channels into the Motion channel so that it can be used for RSMB Vectors. Then make an RSMB Vectors node. You may have to turn the vector scale down a lot, for this shot I used .01 for both.

And lastly, here's my simple Nuke Node Graph for this shot.

Hope that's easy enough for almost anyone to follow. If not let me know and I'll try to clarify.
No comments:
Post a Comment